COUNTLESS HOURS OF GAMEPLAY - Scenarios and Campaign Mode in Valheim.
Join us for a deep dive into the unpredictability of Scenarios, Custom Scenarios and the long-waited Campaign Mode...
Replay Value of Valheim: The Board Game
Adventurers, Voyagers, and Warriors, we’re here with another update, which has been requested a lot!
Before we dive into a breakdown of Scenarios, Custom Scenarios, and Campaign Mode, we want to thank all our fans and followers once again. We are nearing the end of this epic campaign, and it has been one heck of a ride. Thank you for keeping us entertained, focused and helping shape Valheim: The Board Game into the fantastic tabletop experience it has become. We really cherish your honesty, understanding, and,most of all, passion!
Without further ado, let’s jump in. Put on your best sailing cape, because this voyage will be a long one.
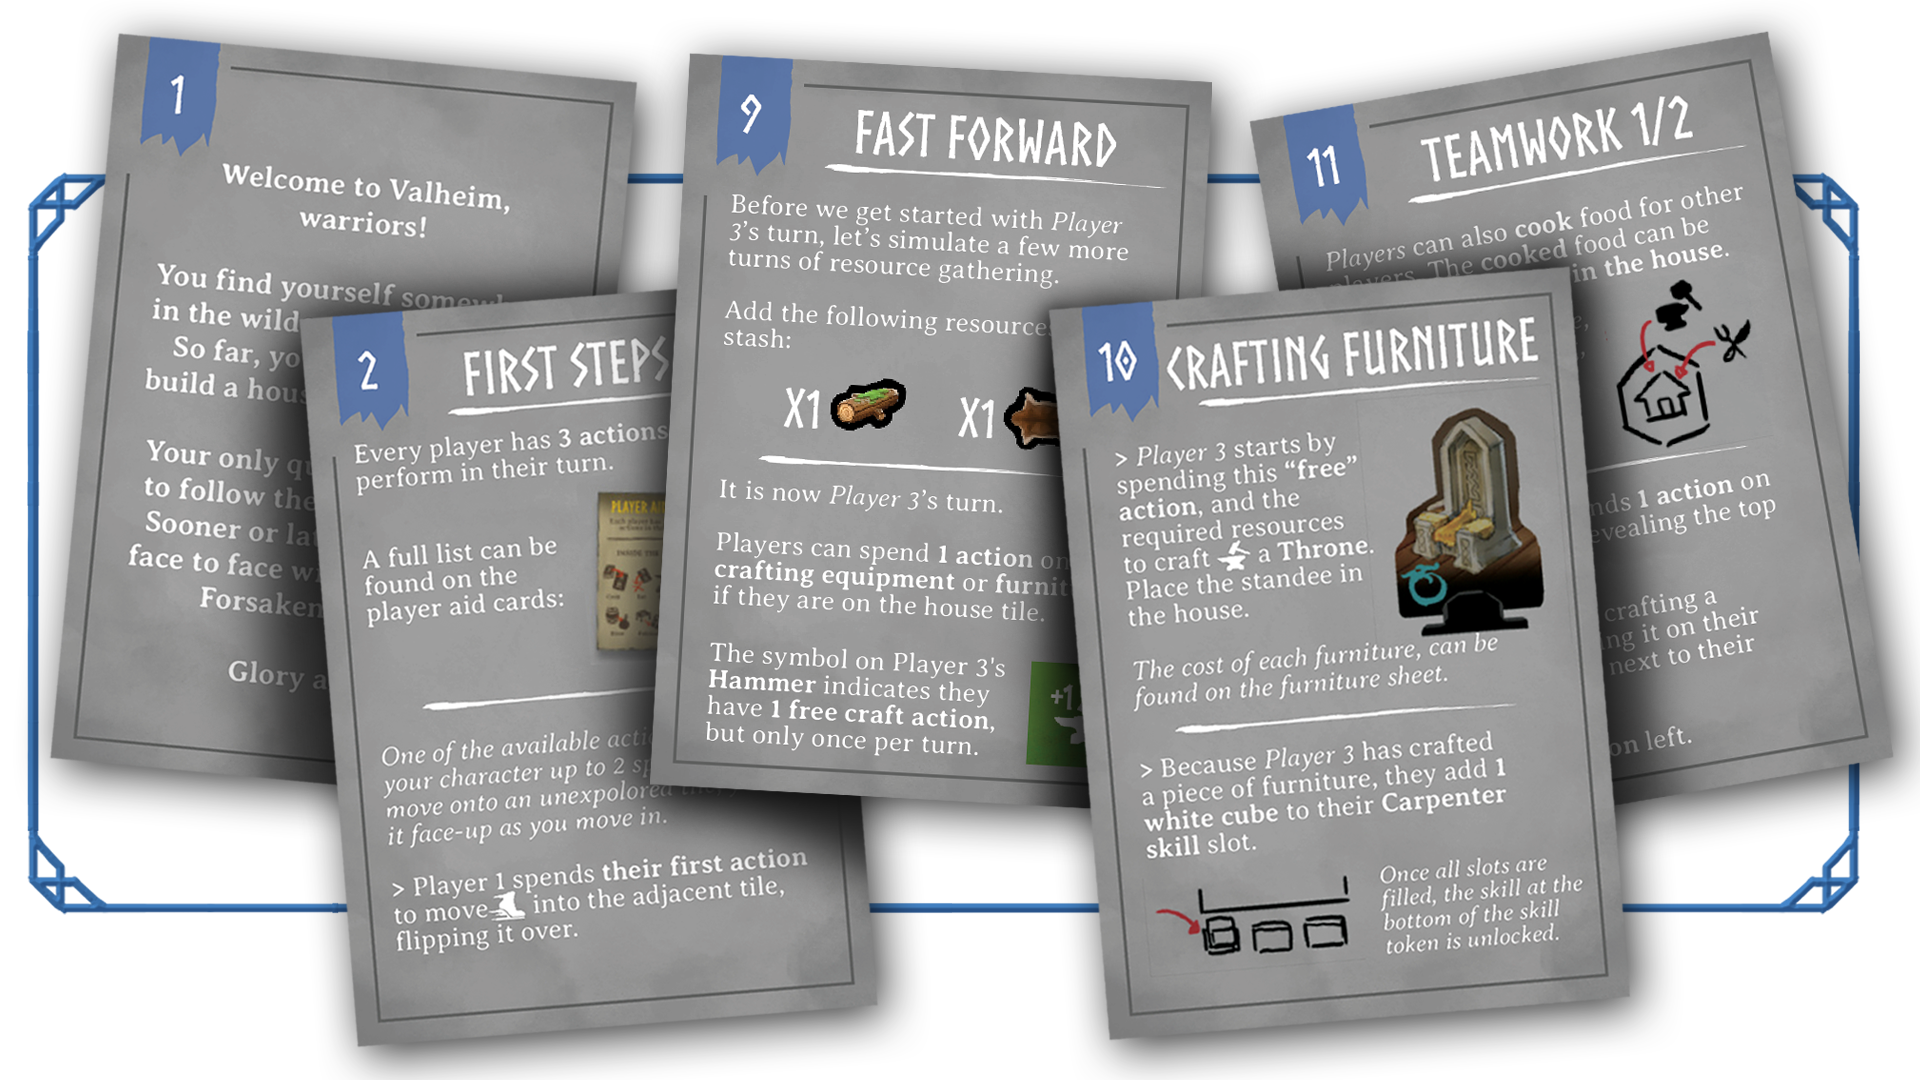
How Scenarios Work

First, let’sexamine how scenarios are set up and how they differ each time they are replayed.
As described in “Deep Dive: Setup and Objectives”, each scenario contains an objective, a map layout, and a story introduction to set the mood (yes, I went there). Most objectives are requirements to summon the Forsaken and progress into the endgame. They can be everything from gathering antlers from stags, acquiring specific gear pieces, and slaying large creatures. Fail to complete the objective before running out of event cards, and you lose.
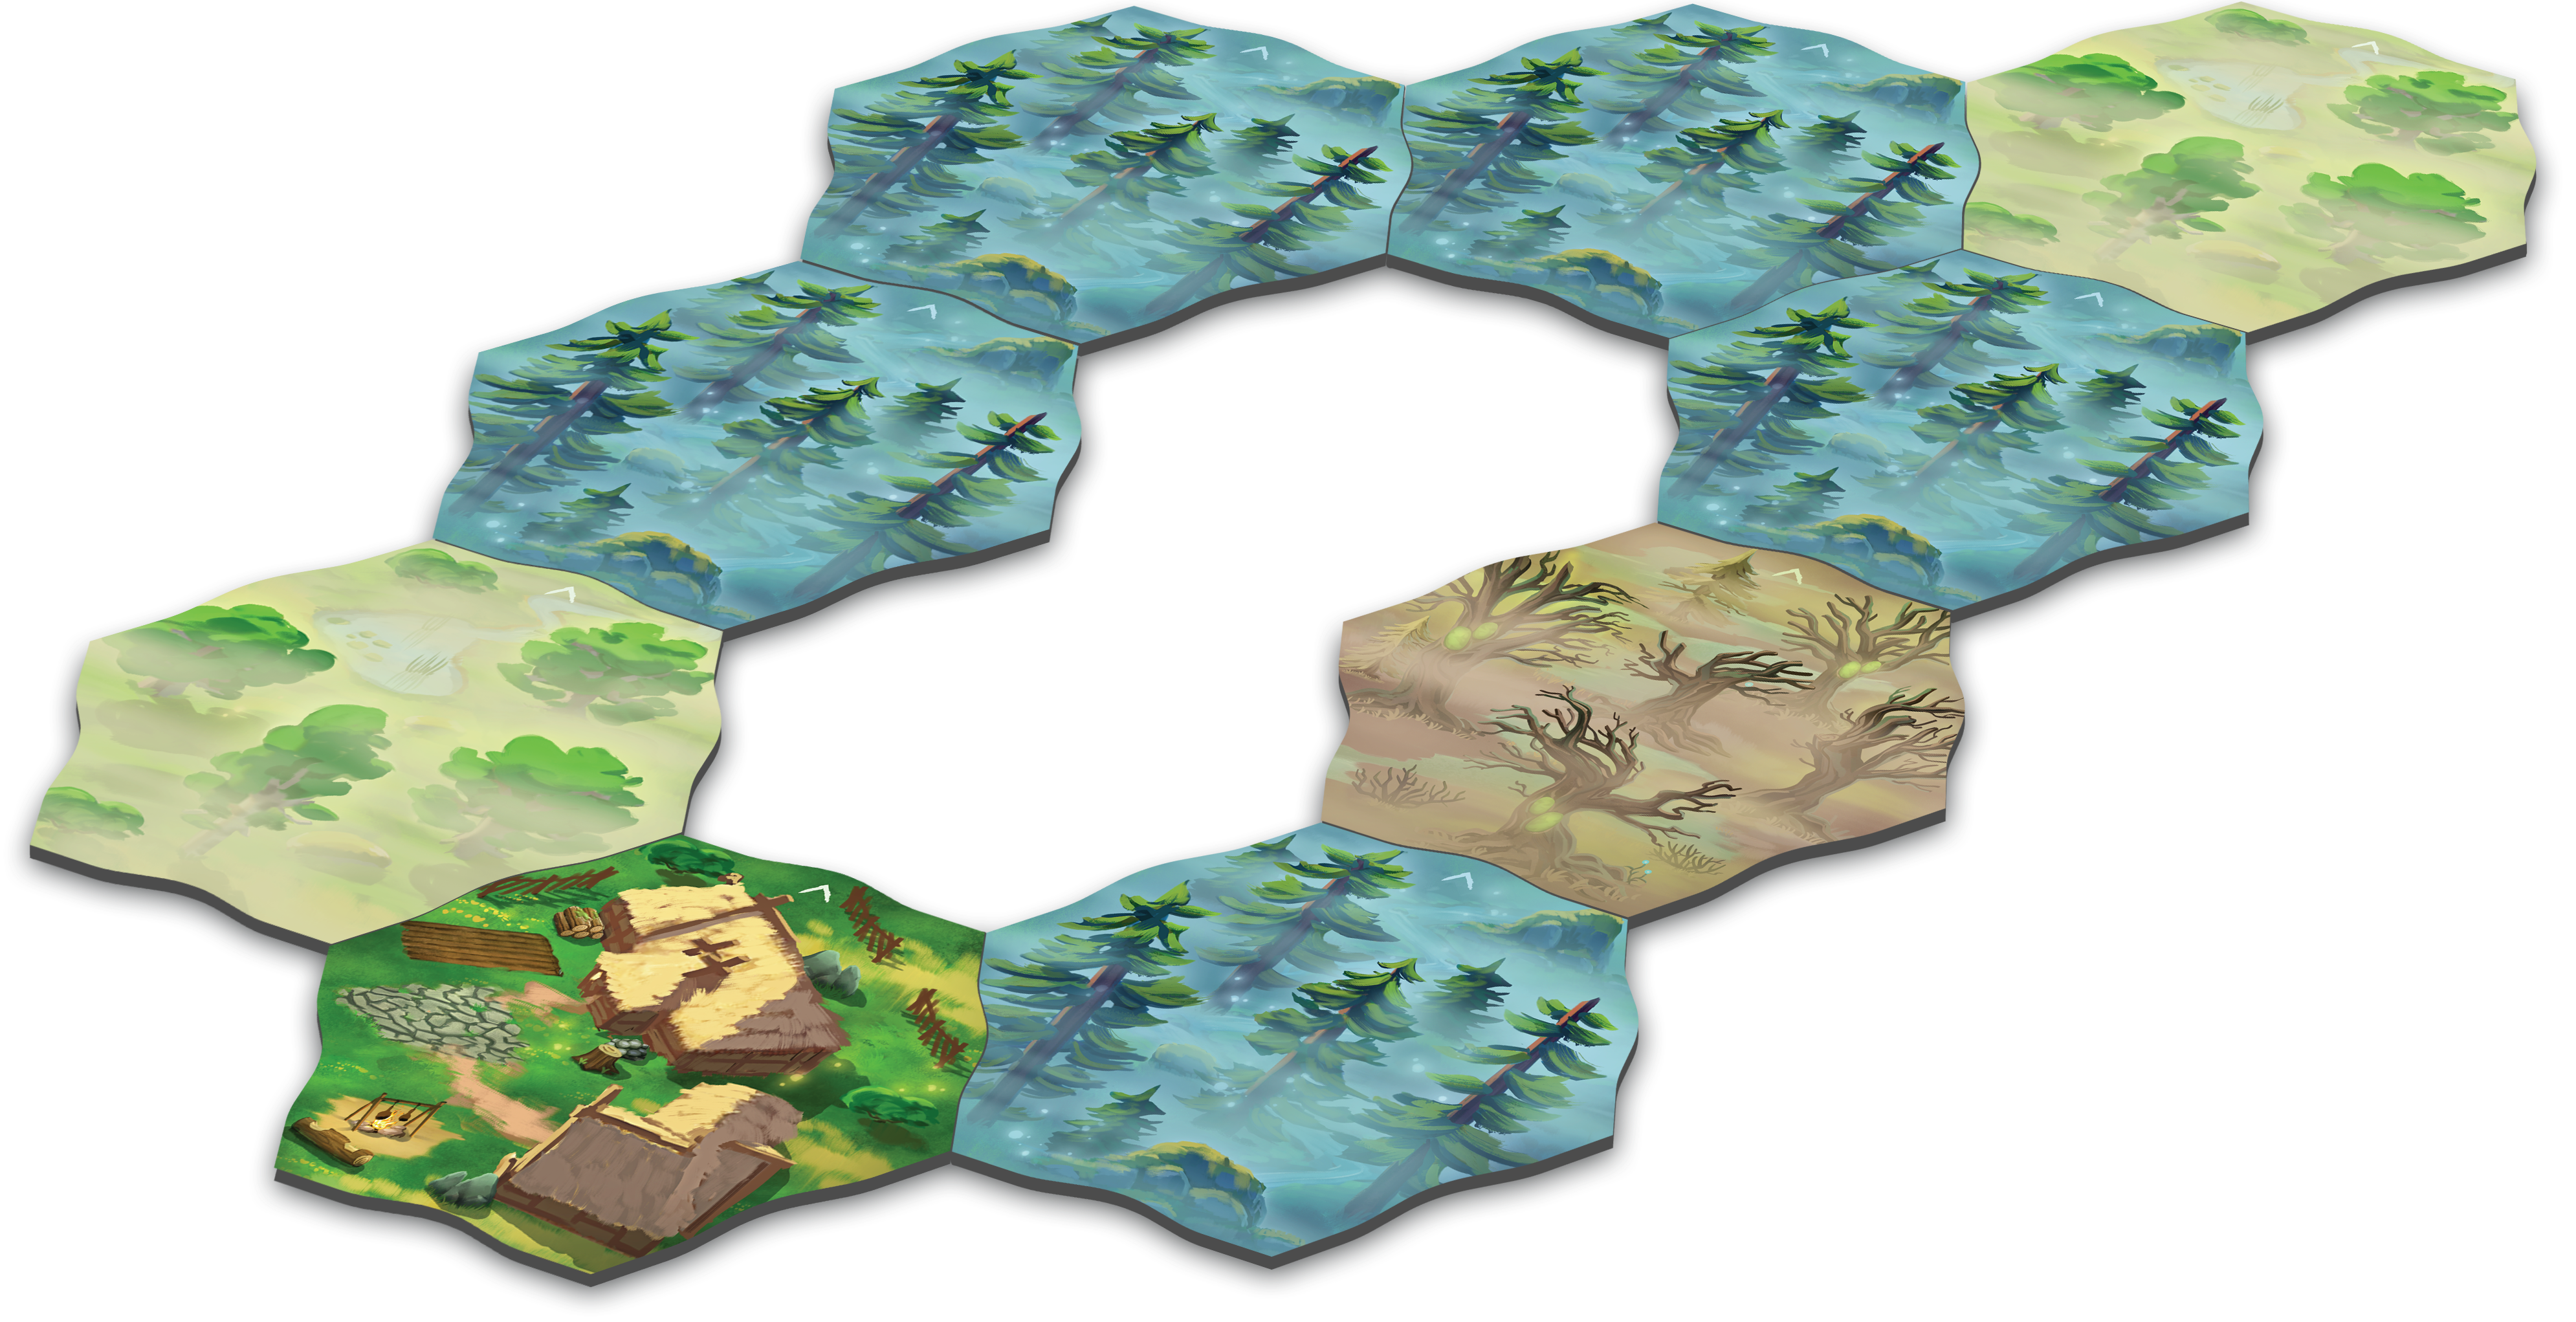
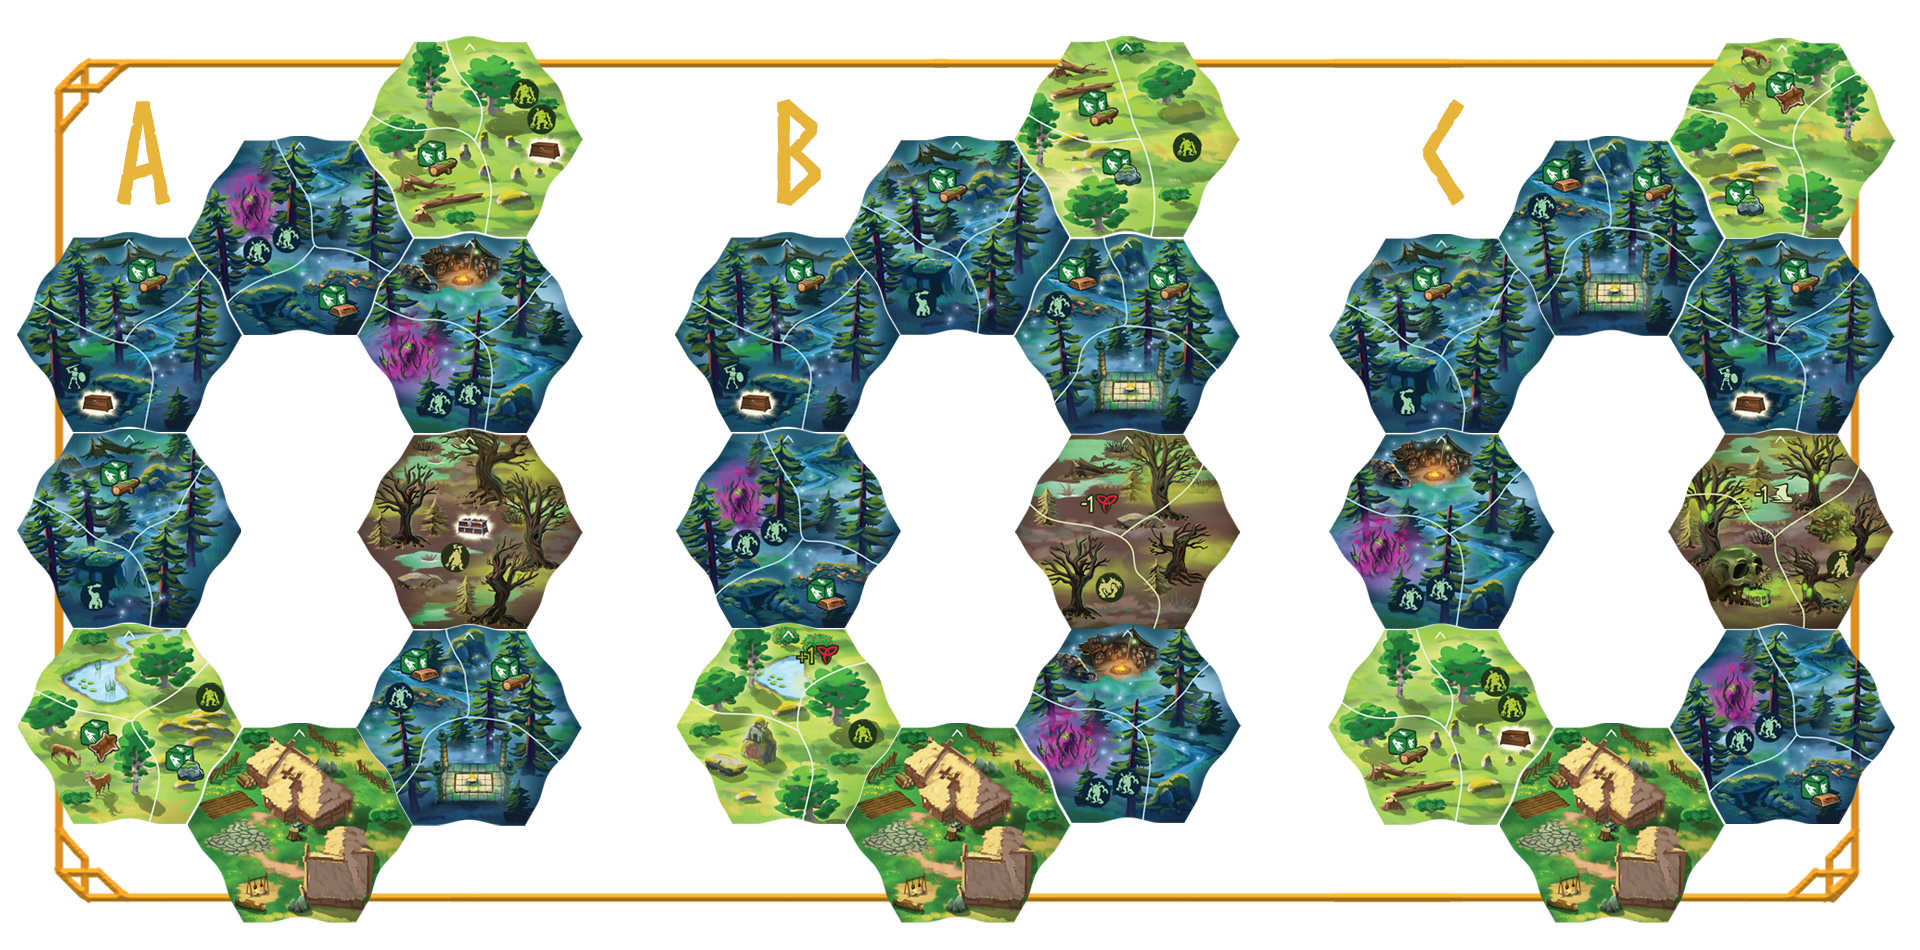
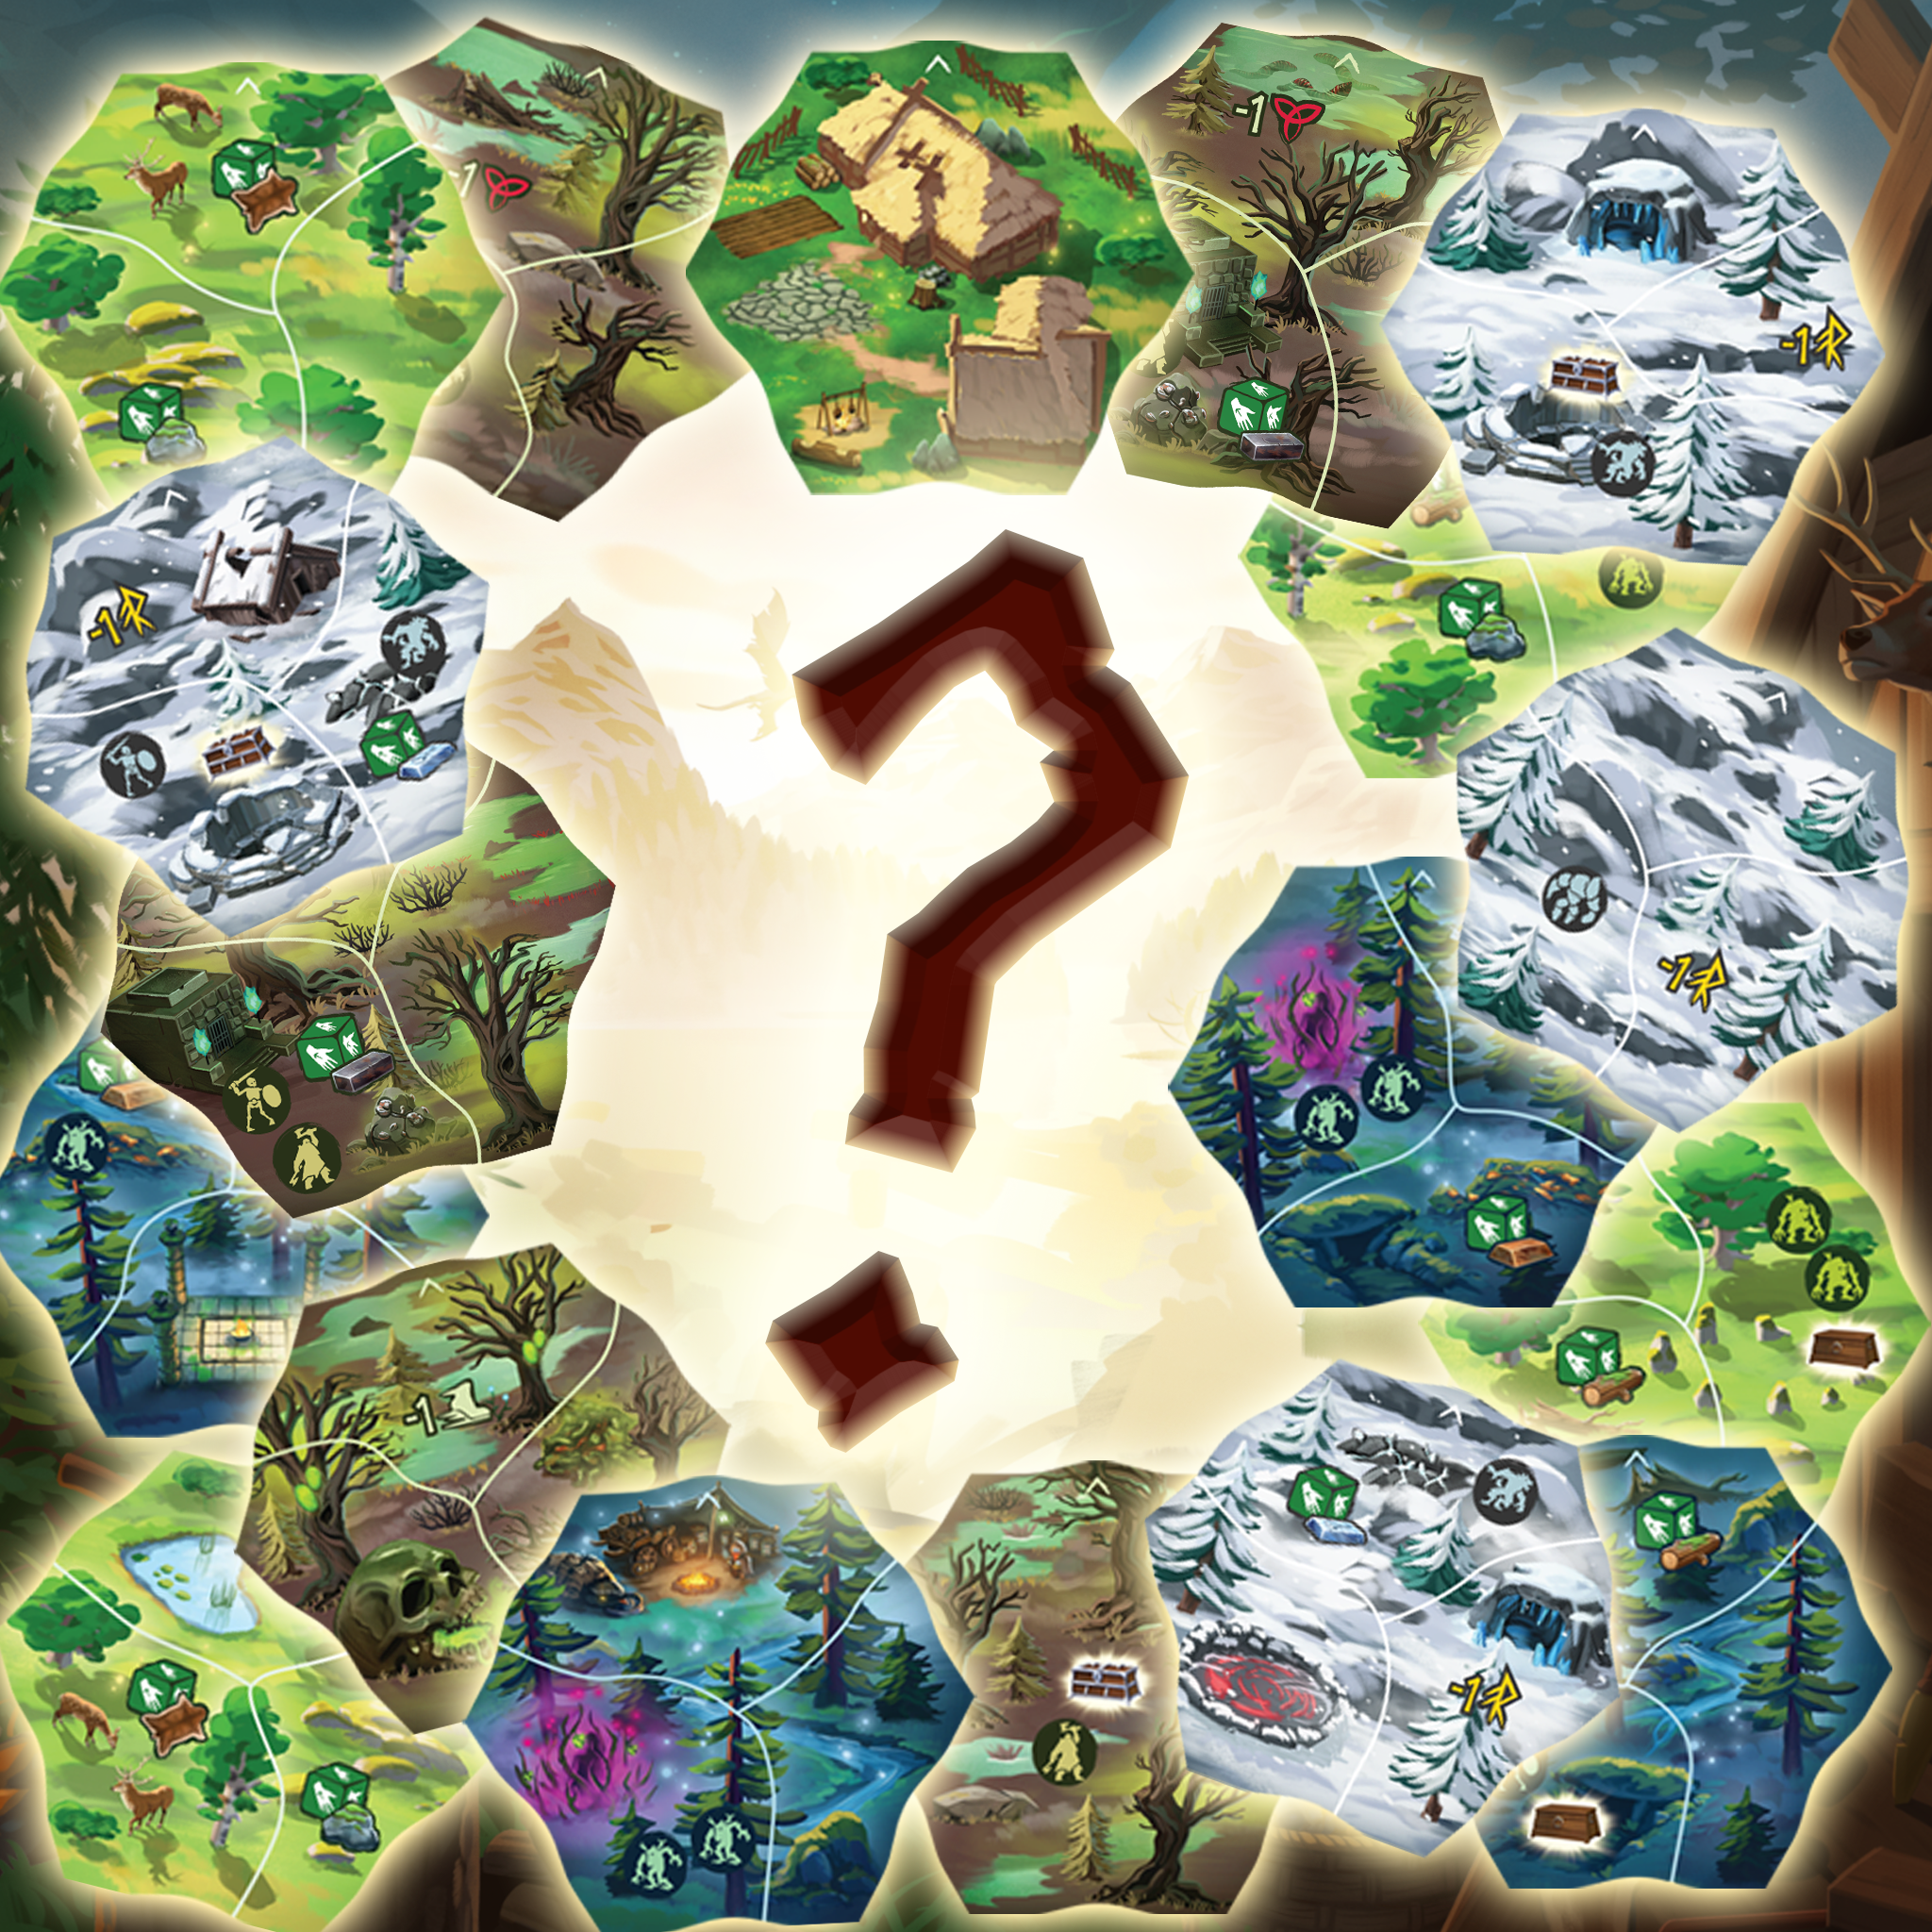
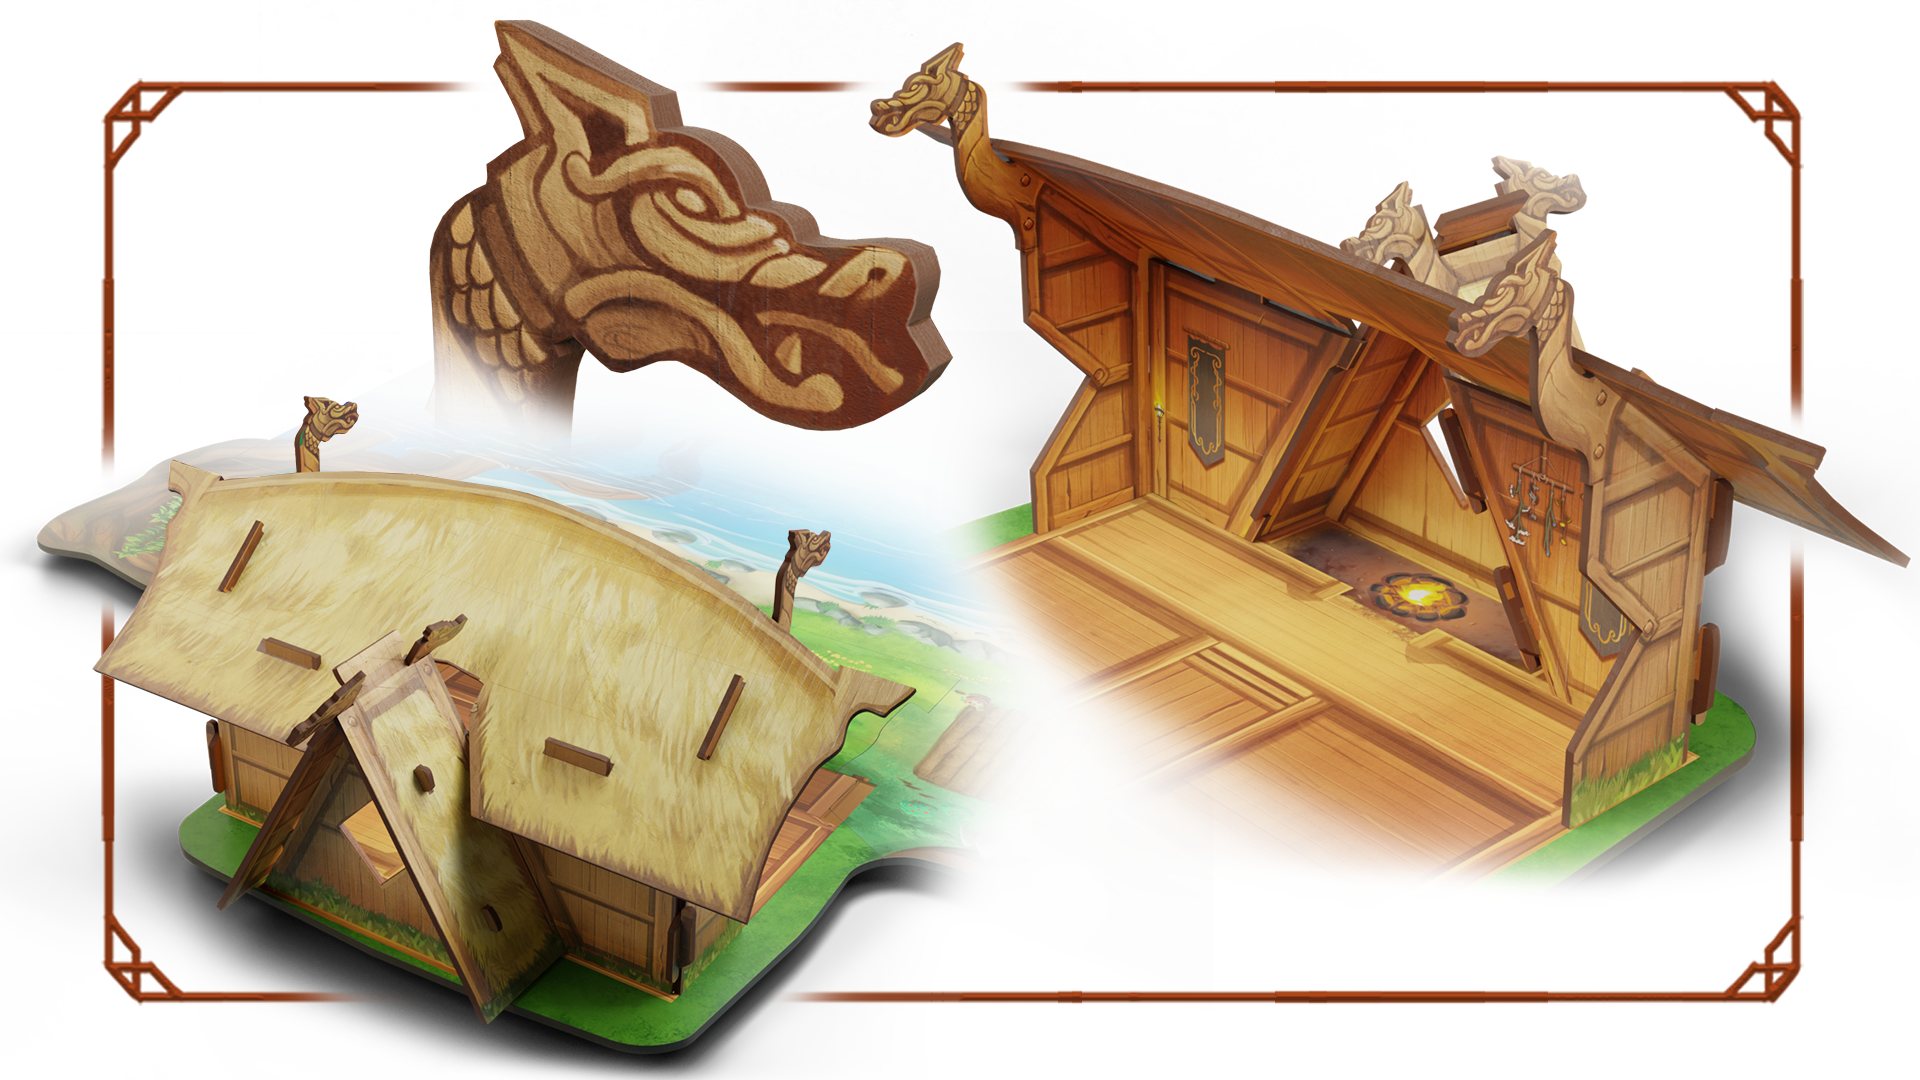
Each scenario comes with a map layout. Here’s an example of how one:
The game comes with a Homestead tile, 5 Meadows, 5 Black Forest, 5 Swamp and 4 Mountain tiles, each offering different challenges and rewards. You always have to start at a home tile - that’s your base of operations. The biomes are based on the scenario, but the specific tiles are selected and placed randomly, facing downwards, so you never know what lies underneath - exploring it can be risky!
Let’s take a look at how different a map can turn out, depending on the random placement. In this scenario, your objective is to destroy the two Greydwarf nests (purple spots) and summon the Elder at his Altar in the Black Forest (square structure).
In layout A, the Altar is close to your base, but the nests are far away. You’ll probably spread out and will uncover all Black Forest tiles before you find them both and destroy them, but you can quickly drop by the home and rest before summoning the Elder.
You also have wood, stone and hide available nearby, so you can rush getting the weaker weapons and cheaper furniture for a smoother start. If you defeat the Draugr in the Swamp you also get to open a rare chest containing useful resources.
In layout B, you can not leave the homestead without stumbling into a fight - but luckily, you will probably have your companions nearby to help you out. The good thing is you can all rest up with some berry bushes afterwards and regain your health.
All sources of wood are far away, so you will have to travel and probably face a lot of perils before getting to it. Oh, and there is a high chance you’ll bump into an Abomination or Troll on your way. Good luck.
In layout C, you’ll probably stumble into a pair of Greylings in the first move, but defeating them will grant you two pieces of Resin and a chest - that's a pretty good start! The downside is that the only source of Stone and Hide is on the other side of the island. A boat might come in handy.
Haldor’s Camp is relatively close, so all you have to do is defeat the Troll, and you’ll have enough coins to buy a powerful piece of equipment. Easy.
Each time you play a scenario, your experience will be different. You might have a strategy from the get-go, but your survival relies on adapting to the situation.
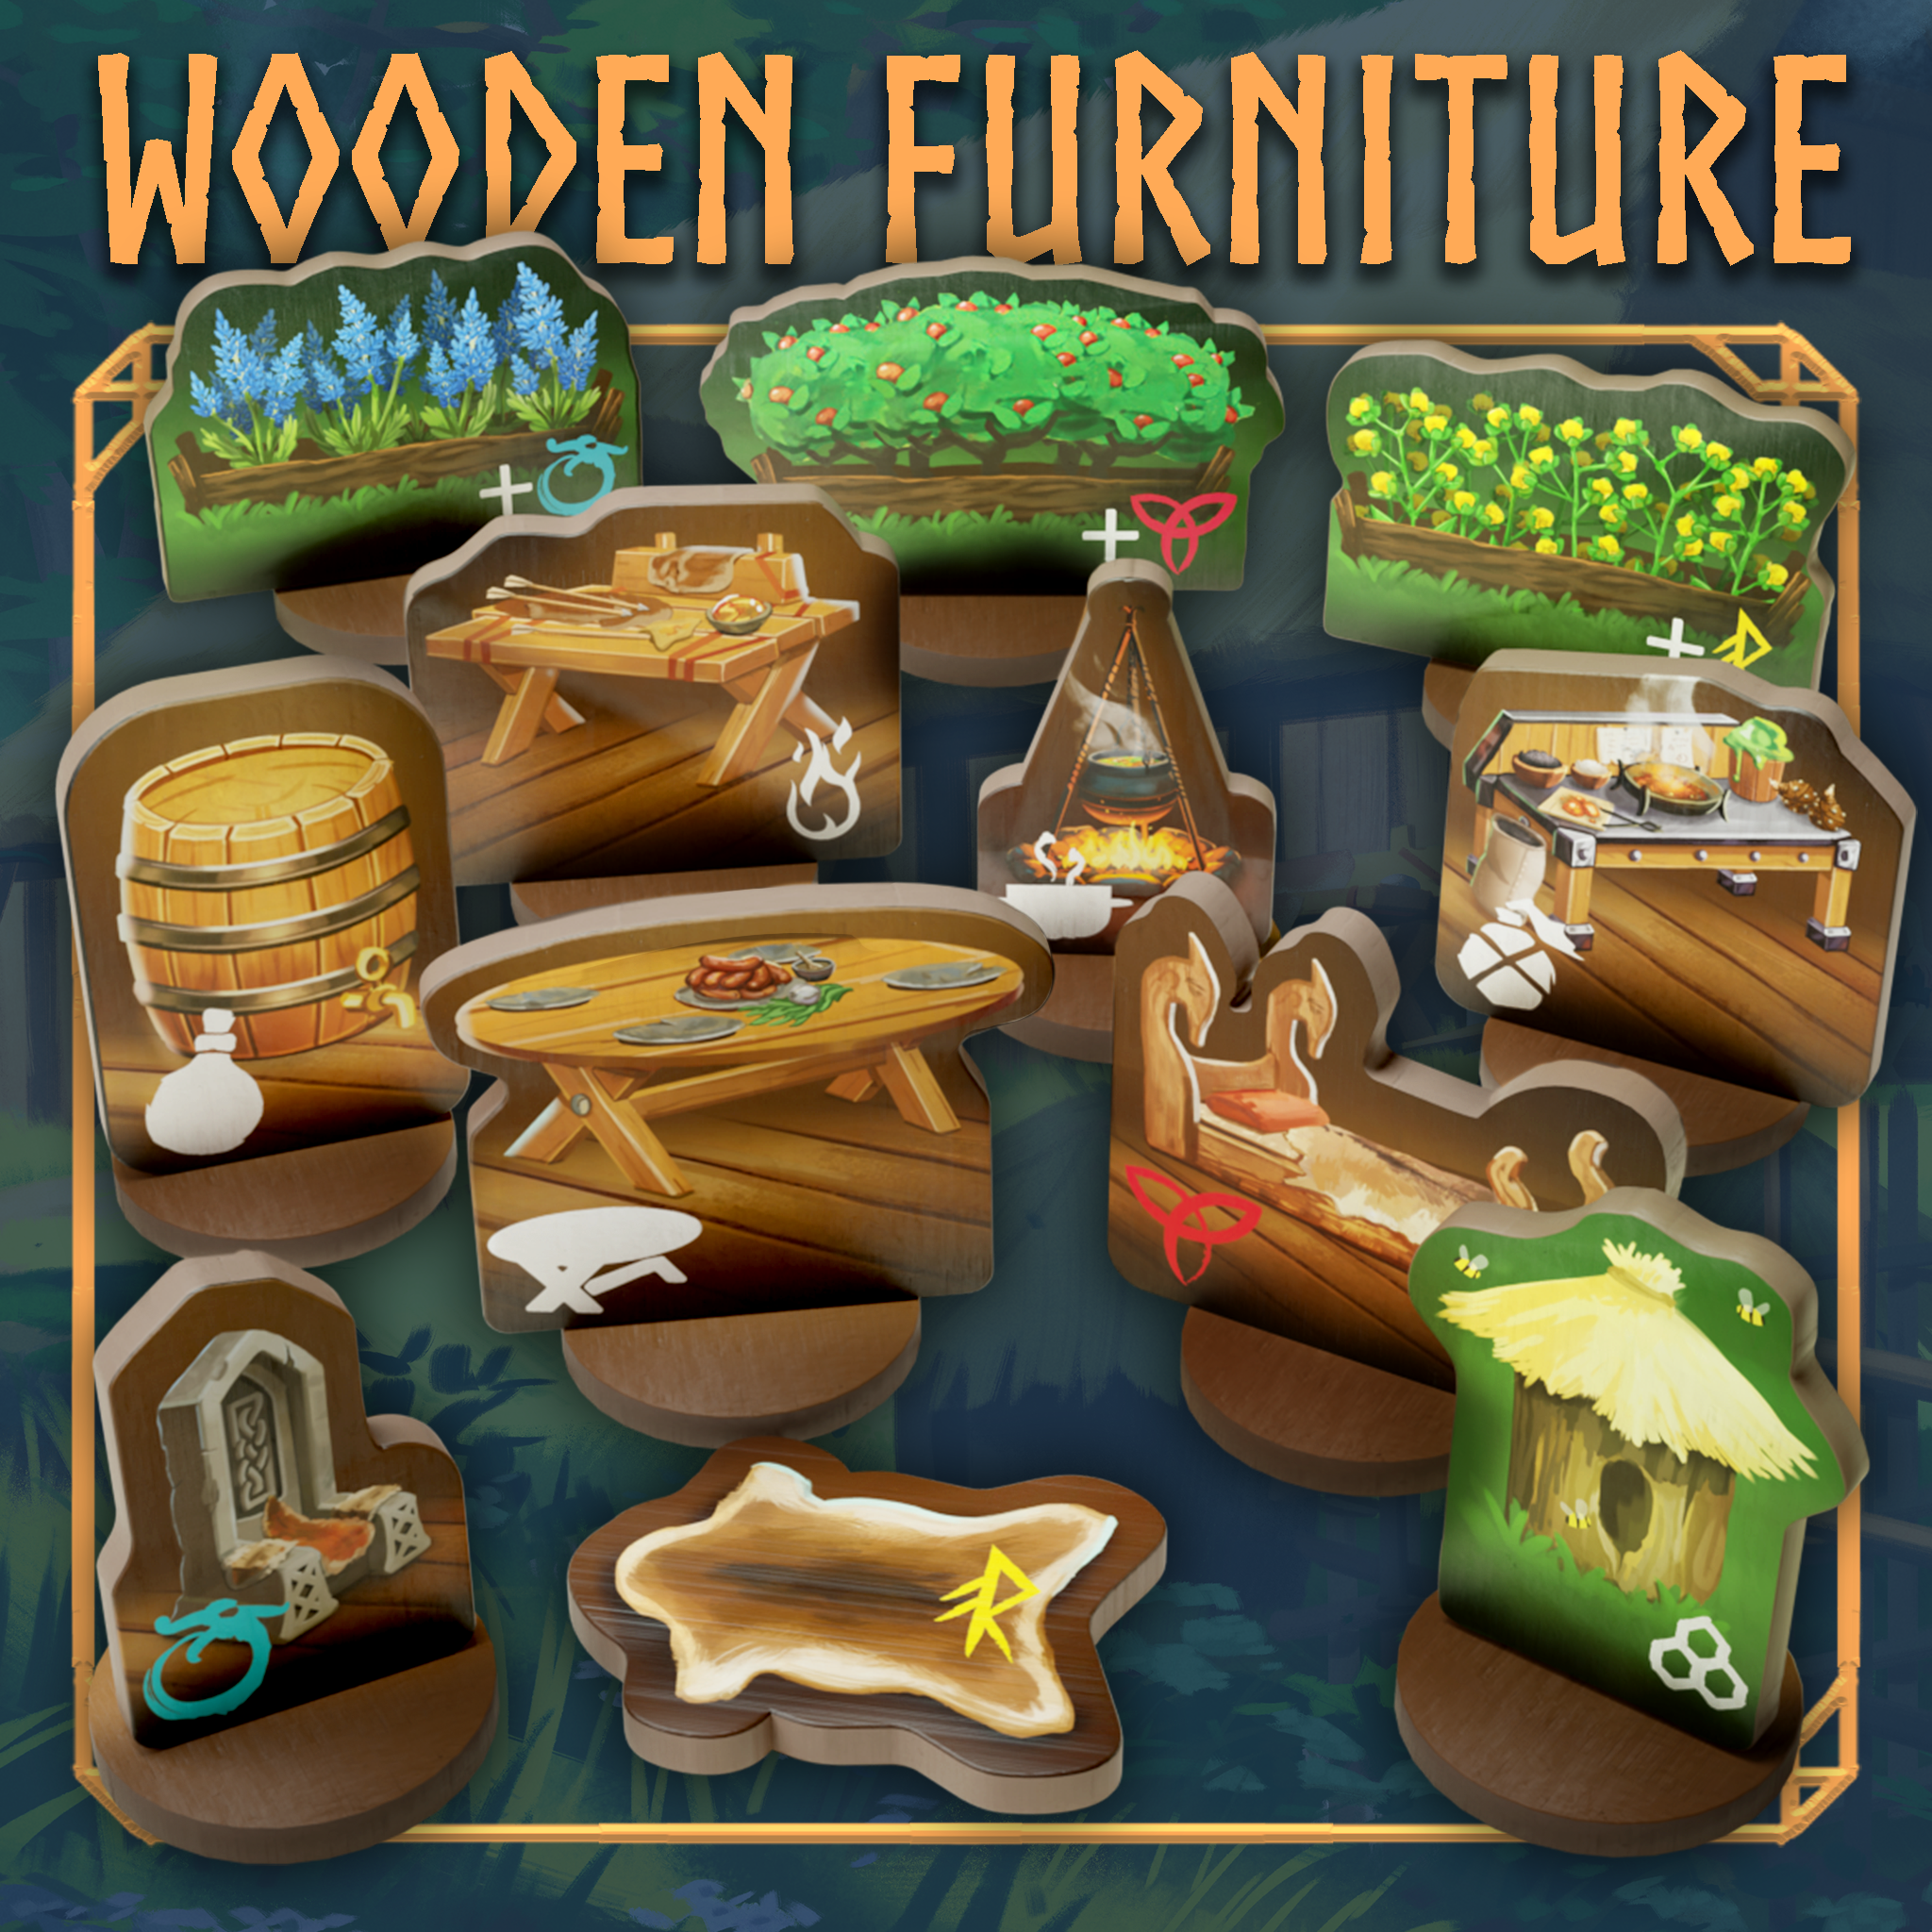
On top of the randomness of the map, you will customize your character before each game. You might be a Tinkering Builder, boosting your ability to craft weapons and furniture, or a Brave Spearfighter, boosting your defense and empowering your spear attacks - so remember to craft one!
It’s worth noting that in most cases, you won’t even have time to explore all tiles. There’s so much you need to get done, and exploring is only part of it. Like in the original Valheim, you focus on what you need to progress - so exploring everything can be costly.
Custom Scenarios

When you have played through each scenario a couple of times, it might be time to voyage into uncharted waters! You are now a proper hero of Valheim and can design your own adventures.
There are plenty of options to set up your own scenarios with custom objectives and map layouts. There are a few limitations, though: For example, you’ll have to make sure the Eikthyr Altar Tile is in the game to be able to summon him, or you need to have enough sources of coins if the objective is to buy Haldor Gear. But don’t worry, the rulebook will include a quick guide to what is required to make a custom scenario work.
Other than that, your imagination is the limit! Want to try a map with all the tiles at play? Better get those running shoes on. Want to try a setup with 6 islands? It might be nearly impossible to win, but go ahead!
Campaign Mode, The True Challenge

Now that we have been around how scenarios work, we’re excited to finally reveal how Campaign Mode works! Let’s jump into what you have been waiting for.
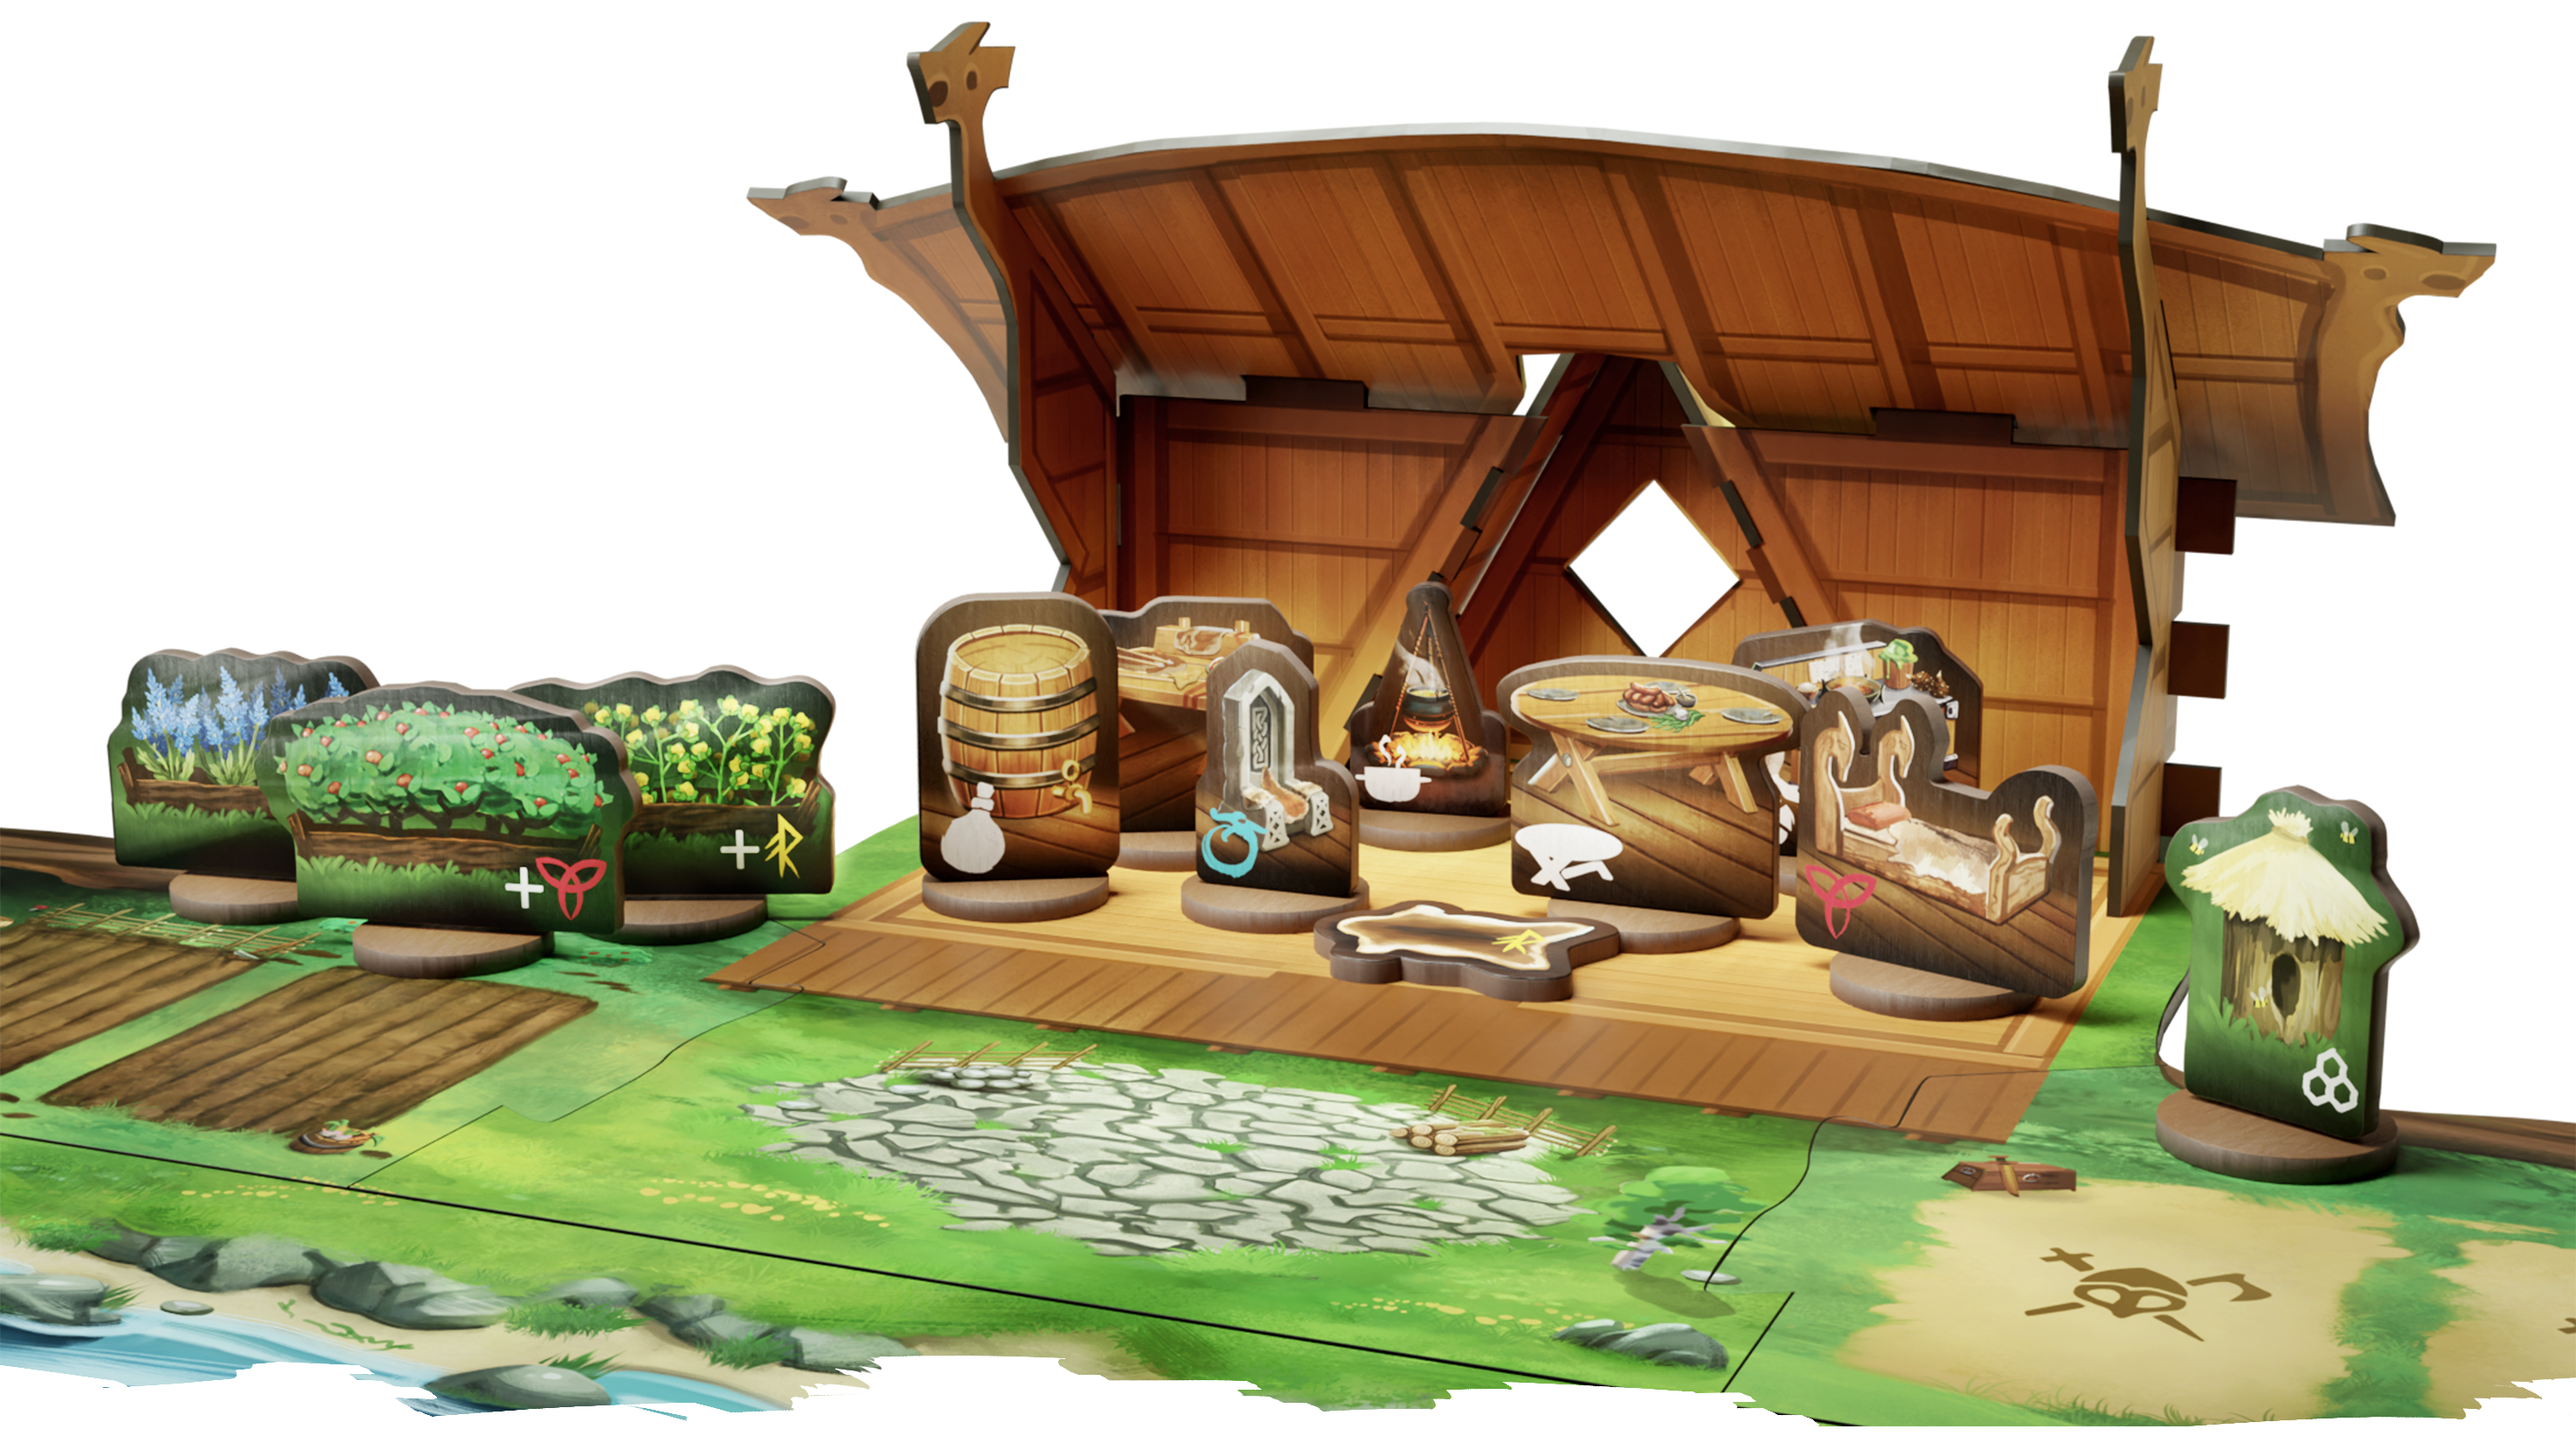
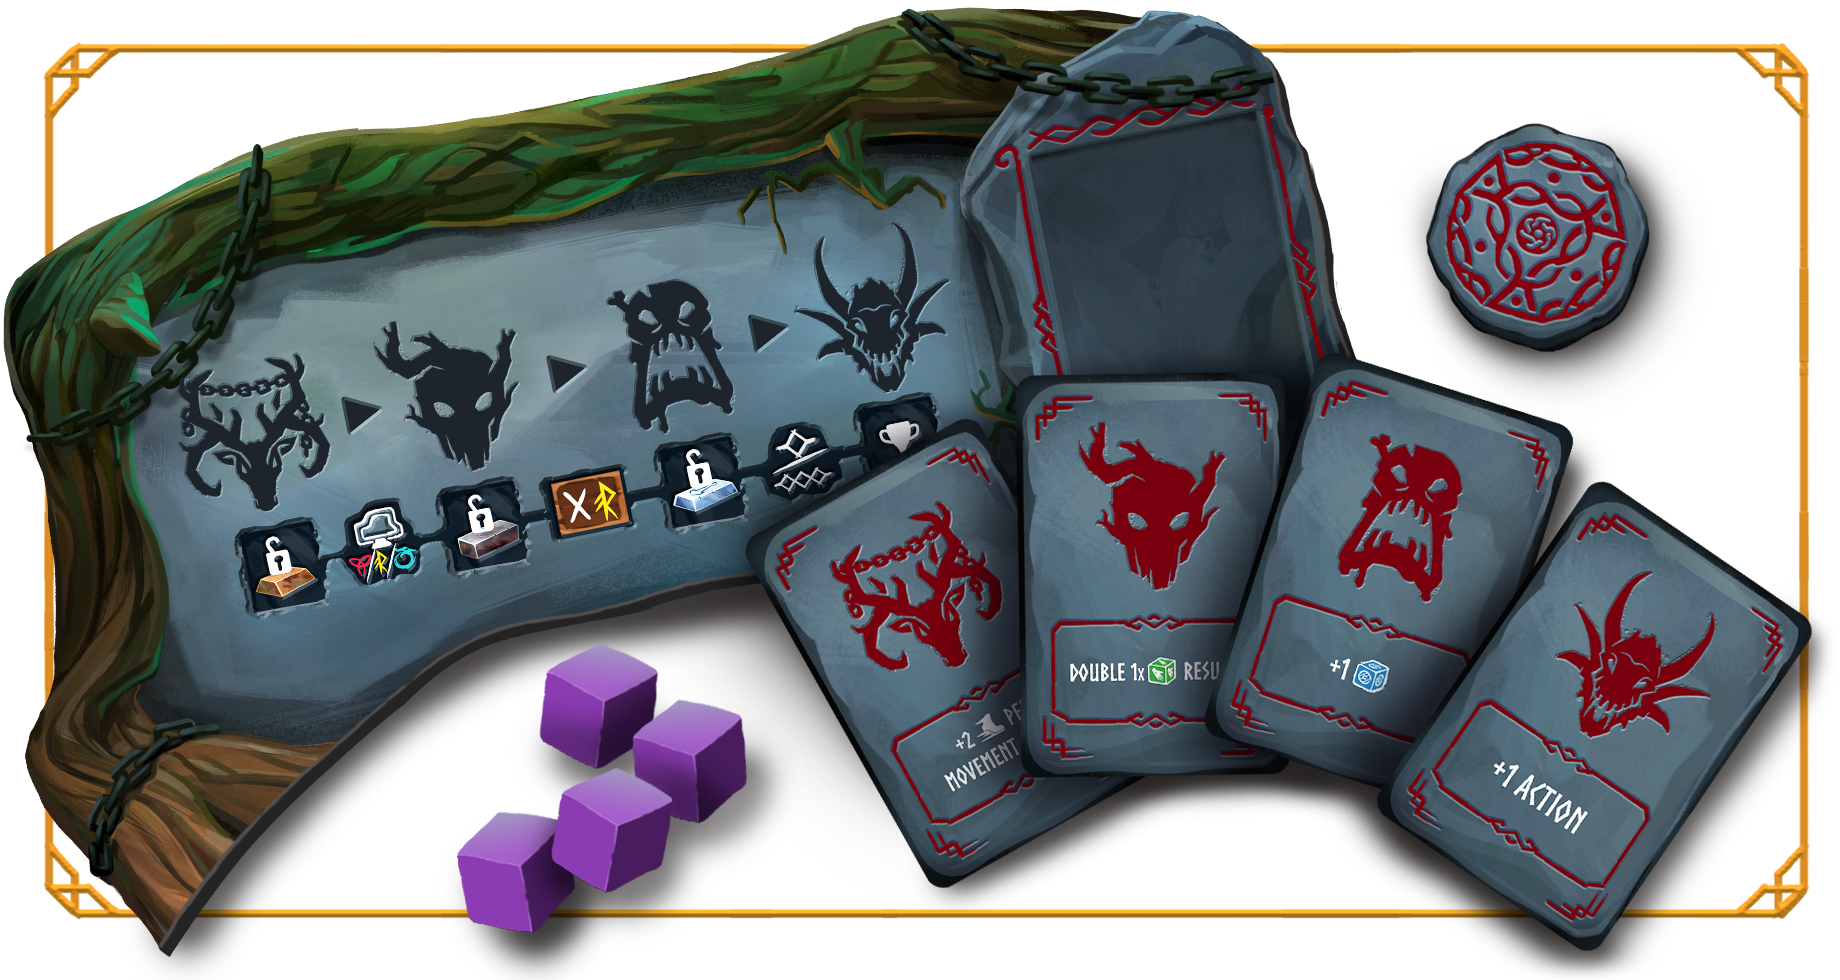
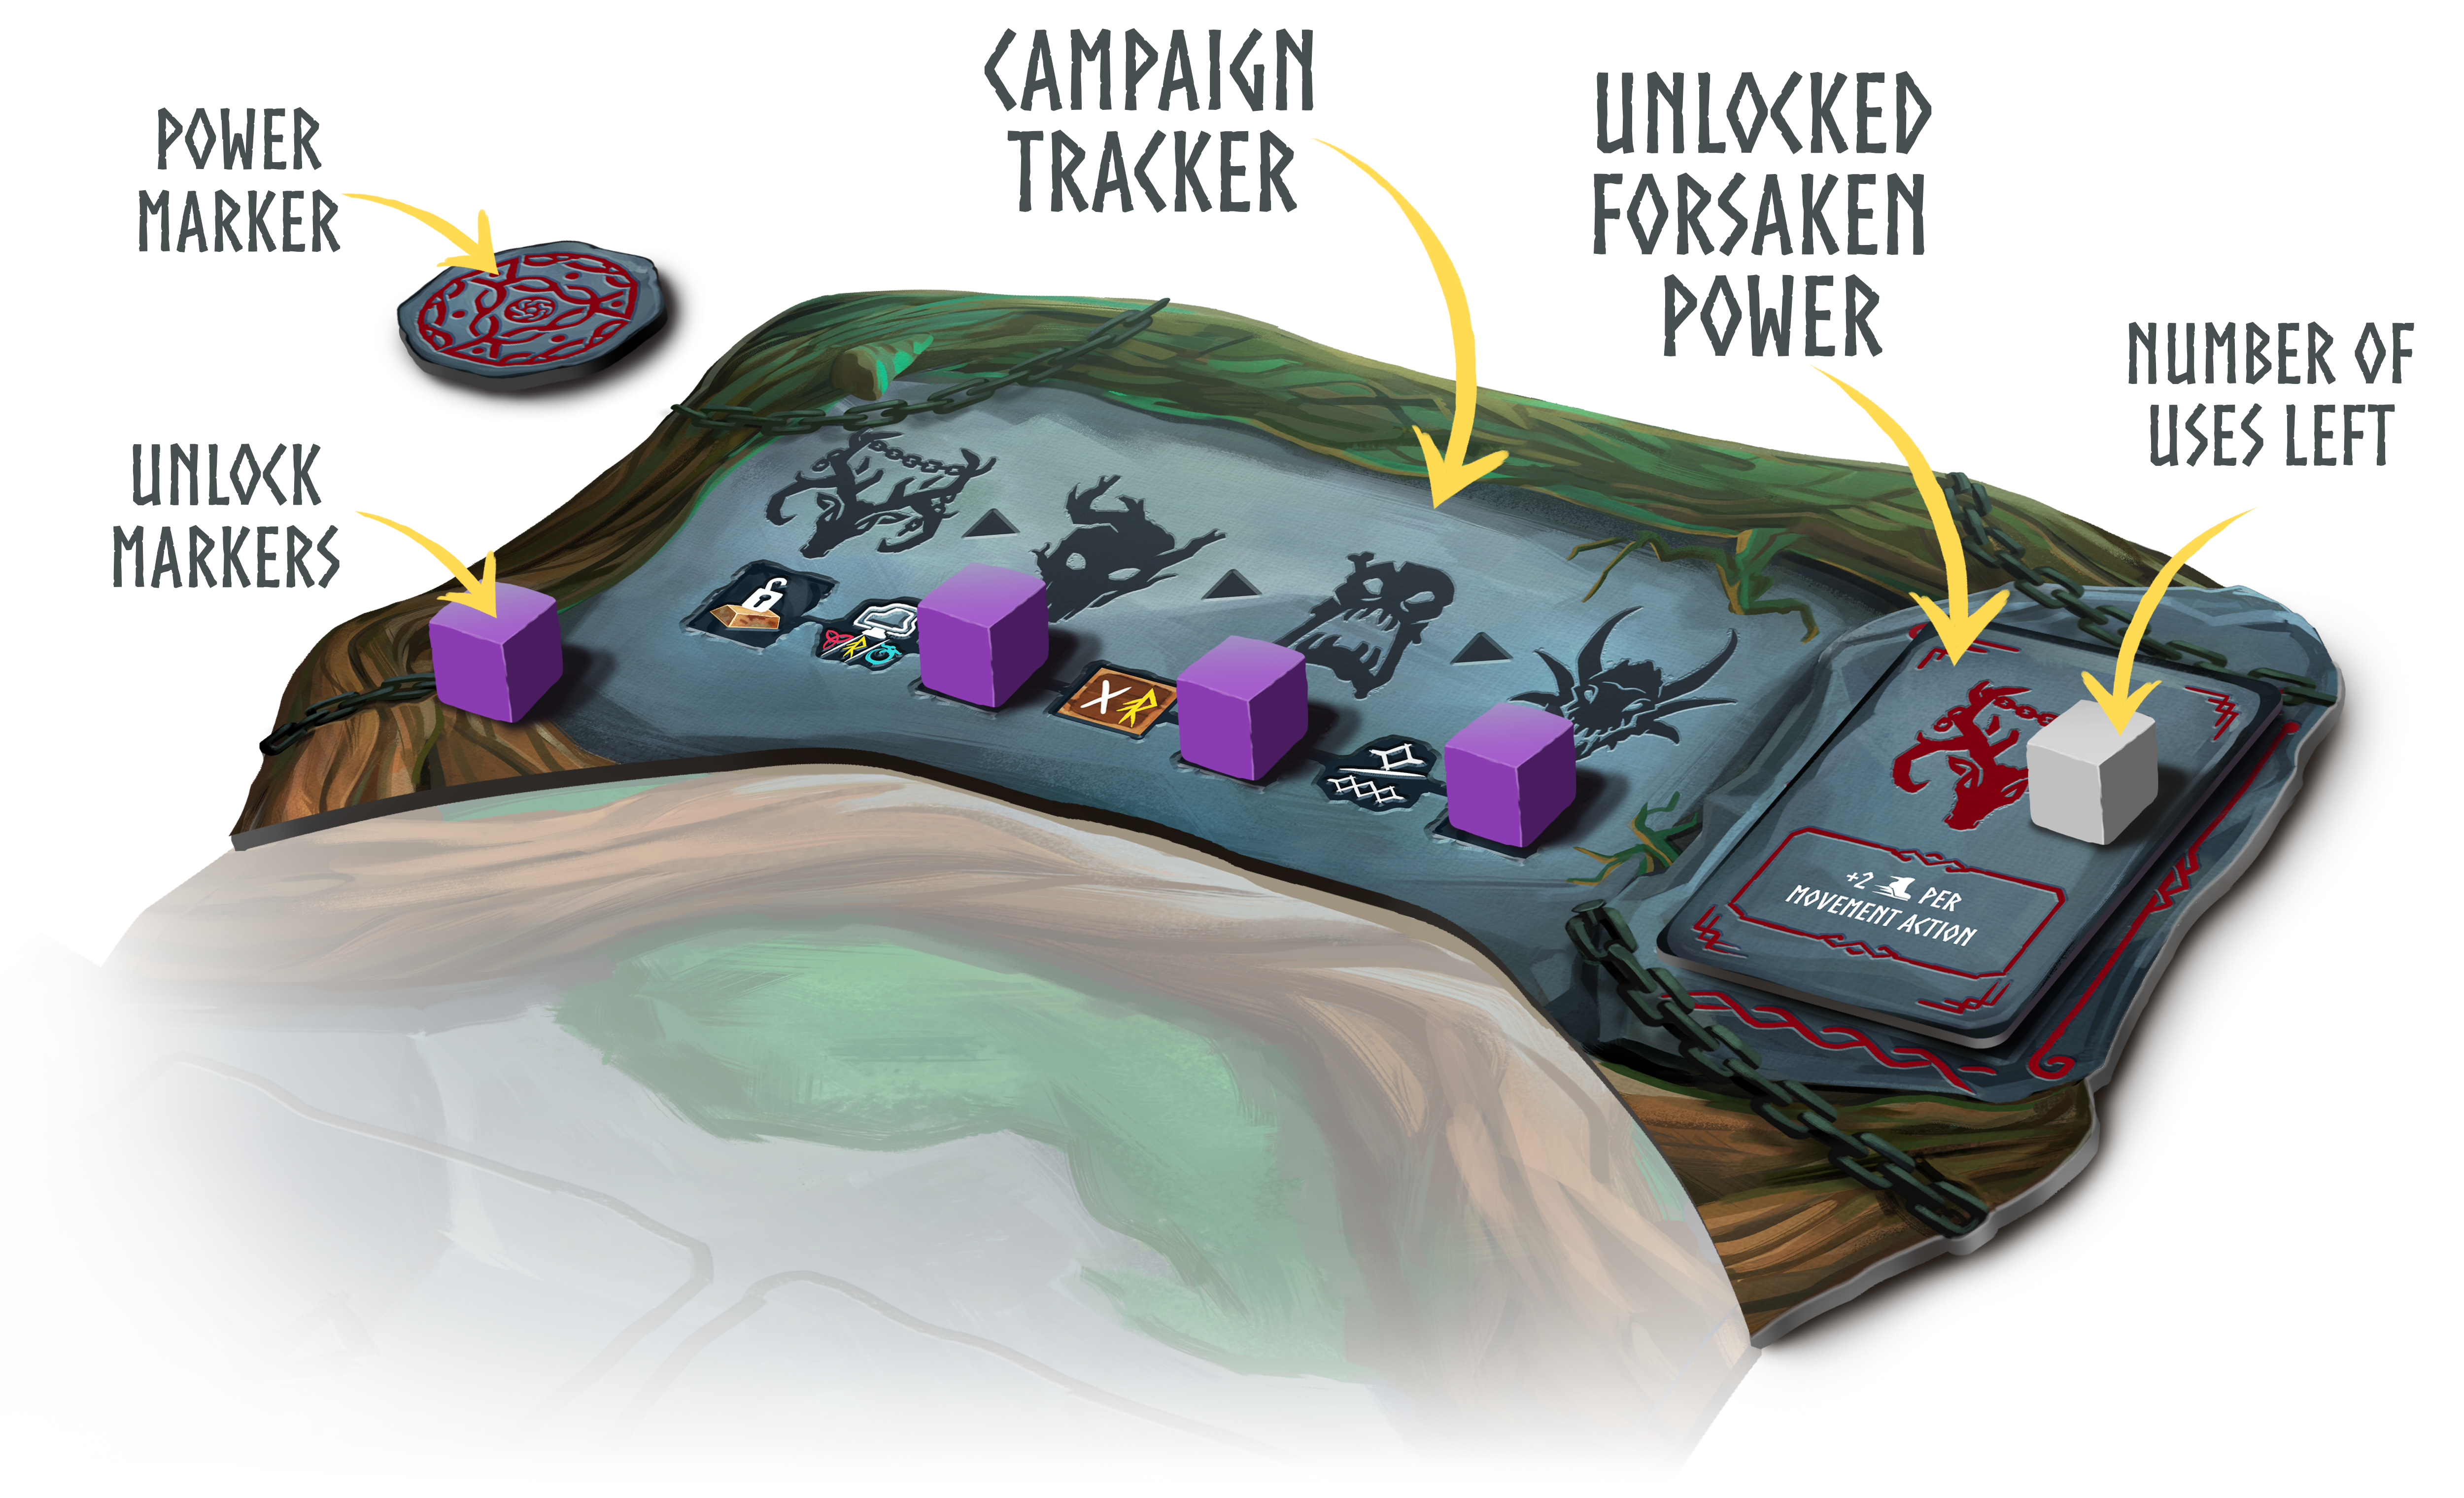
All versions of Valheim: The Board Game will include a Campaign Board!
Like with everything else, the Campaign Board is seamlessly attached to the top of the boss board, if this is the mode you want to play. This acts as a tracker for the progress and holds Forsaken Powers.
Campaign Mode features 4 unlockable Forsaken Powers!
Each scenario will take around 60 to 120 minutes, depending on the player count, your skill, and the difficulty of the selected scenario. If you have dedicated the whole evening, or want to play consecutively over a couple of days, you can also play Campaign Mode, adding even more mechanics!
Each Campaign consists of 4 scenarios, so the game time will be roughly 4-5 hours. You will be selecting what scenarios you want to play, one for each Forsaken boss. When starting a new scenario, you start (almost) from scratch and customize your Viking.
You’ll start with a Eikthyr scenario. this first game will act like any other scenario but with an extra challenge: You cannot mine any metals! You might get lucky and loot it in a chest, but in most cases, you will have to make do with basic gear and furniture.
If you manage to defeat Eikthyr, you’ll
progress to a Elder scenario. This time, you will be more prepared: You can now bring the throne, the rug, or the bed with you - so be sure to craft it in the previous mission! You can now mine bronze, but Iron and Silver are still off-limits.
You have now also unlocked the Eikthyr Forsaken Power: twice during this scenario, you can activate it, improving your traversing action so you can move +2 spaces, affecting all players for 1 round
If you succeed, you
move on to a Bonemass scenario. In addition to the furniture, you can bring over your Odin Power from the previous mission, so you have 2 Odin Powers. You can now mine Iron as well!
As a team, you can now also select the Elder Forsaken Power: double one of your resource gathering dice results. As with the Eikthyr Power, this can be activated twice for a whole round.
Finally, you will
face a Moder Scenario. In addition to the furniture and the Odin Skill you carry over from the previous scenarios, you get to pick one of the two upgrade skills you unlocked and bring it with you. This is essentially a third skill that comes in already unlocked. Powerful stuff.
All metals are now minable, and you add the Bonemass Forsaken Power: +1 defensive die in combat to your selection. You pick one of the 3 unlocked Forsaken Powers for this final game. Again, you can activate it up to 2 times at any time.
If you manage to defeat Moder, you have won the Campaign!
Congrats, you are now a hero of Valheim. One thing, though: You now also unlocked the Moder Forsaken Power: +1 Action. We thought you might want to bring it on your next journey, but the choice is yours.
Final Notes
In conclusion, all editions of Valheim will come with Campaign Board, 4 Forsaken Power Tokens, 4 Progress Cubes, 2 Forsaken Power Consumable Cubes, and a Forsaken Power Token to keep track of who activated the power.
That’s it for today, folks. Skål to countless hours of action in Valheim!
The MOOD Publishing Team

")


 ), poi ai 155 euro del pledge si sono aggiunte le VAT per altri 34,10 euro